Showing posts with label baking. Show all posts

Monday, 6 October 2014

Tea Time: Herman The German Friendship Cake

Have you ever met Herman? Herman has been living on my kitchen bench for the last couple of weeks. He smells a bit like a brewery, and he has to be fed every few days. But it's been fun having his company.

Herman the German Friendship Cake was a gift from a friend. He is a sourdough cake batter that you prove for 10 days before dividing and baking. It makes a lovely rich, buttery cake, and also a very unusual gift to give to your friends and family.

Here are some happy snaps with Herman:

The Original Herman recipe - with green apple and sultanas

Herman with Banana and Blueberries
I even made some pancakes with Herman. The first batch were a little dense, because in my half-awake state I forgot to add any raising agents. They still tasted delicious, and today's batch with self-raising flour were perfect. Soft, fluffy and with a lovely sourdough taste.

How do I stop at just 4?
Herman is now having a little holiday in the fridge. I need my benchspace back, and there have been complaints about how the kitchen always smells!

If you don't have a friend with Herman, don't worry - the website gives you the instructions for starting your own Herman. And then you can share some sourdough love with your friends too.

Tuesday, 1 July 2014

Tea Time - Muesli Biscuits


Morning and Afternoon Tea are very important in this house. Without them, the small person gets Very Hungry, and that is a troublesome time for everyone involved.

I have to admit, muesli biscuits are one of my favourites to bake. You can "cheat" and use a pre-made muesli, or you can start from scratch with rolled oats and add all your favourite bits. The variations are endless, and the result is a very wholesome little snack, full of filling fibre. They also make a fantastic gift for a mum with a new baby. If you add a couple of tablespoons of Brewer's Yeast and some LSA meal, it turns ordinary muesli biscuits into a super snack to help boost breastmilk production and give a tired mum some lasting energy (especially good for those 3am feeds).

They're also so easy to make that they're a great recipe for getting a small person helping in the kitchen. We didn't even measure the ingredients, we just threw in "enough" of everything. There's apricots, sultanas, puffed wheats, hazelnut meal, coconut, honey and golden syrup.

But if you need a recipe, this one from Taste.com.au fits the bill nicely.

Cheers!

Saturday, 18 August 2012

Behold! The Rainbow Cupcake


Because nothing says "Happy 30th Birthday! Welcome to responsible adulthood!" like rainbow cupcakes :)

I made these for a birthday party we went to today. I don't actually count these as food because they were made with packet vanilla cake mix, and lots of food colouring. But they were fun to make and look fantastic.

To get the layers, I allowed the cake mix to partially cook and firm up in between colours. The cake needed to be cooked at a lower temperature, so the mixture didn't rise too quickly and warp. I also used silicone muffin cups in the tin so that I could peel them off easily to show off the layers.

I got the original idea from Allrecipes.com, but I feel that using 6 layers in a cupcake is unnecessary. Not only will it take too long to make (especially if you have lots of them to make) but as you can see from the original photo, the violet layer looks grey and the orange layer is lost between the red and yellow. Having just blue, green, yellow and red gives the impression of a rainbow, but is much easier to make.

The topping is Betty Crocker Creamy Vanilla Frosting, with a piece of sour strap lolly on top, and some sprinkles.

PS. Rainbow Brite turns 30 next year. I'm starting to feel old.

Friday, 13 July 2012

Dairy Free Oatmeal Cookies

I made a delicious batch of dairy free and gluten free cookies the other week. They used pumpkin puree to make a lovely chewy cookie, but with very little fat and refined sugar (it used pureed dates and some maple syrup). No photos because they all got gobbled up (but the recipe is here if you're interested).


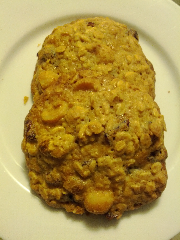
 They were so easy to make, I had to make some more! These are oatmeal cookies with cranberries and macadamias. My little boy loves them, and I feel a lot less guilty letting him munch on one of these than I do when he stuffs a packet of little teddies in his mouth (especially since he is going through a very picky stage and won't eat much of anything). The best thing is you can start with the basic oatmeal mixture and add whatever extra goodies you like, such as chocolate chips, nuts, seeds or any dried fruit. They keep for at least a week in an airtight container, or you can freeze them for later. I think the next batch will be apricot and almond.


Basic Oatmeal Cookies (Dairy Free)

Dry Ingredients
2 cups rolled oats
1 cup plain flour
1 cup loosely packed brown sugar
1 tsp baking powder
½ tsp salt
½ tsp cinnamon
1 cup of yummy bits (coconut, dried fruit, chopped nuts, choc chips or seeds, or any combination)

Wet Ingredients
2 eggs, beaten
¼ cup maple syrup
60ml light vegetable oil
½ tsp vanilla extract

Preheat the oven to 180∘C, and like a baking tray with non-stick baking paper.
In a large bowl, mix together all the dry ingredients. Mix well to break up any lumps of brown sugar. In a separate bowl, mix the wet ingredients, then add to the dry mix. Stir until just combined. Drop tablespoonfuls of the mixture onto the baking tray. Allow space between for the cookies to spread. Bake for 15-20minutes or until golden brown. Allow to cool on a rack. Makes approximately 16 large cookies.

Sunday, 8 April 2012

Happy Easter

Happy Easter!

This year I've managed to avoid the chocolate frenzy that usually happens this time of year. The toddler is still too small to realise that all the shiny things in the shops have chocolatey goodness inside. I suspect next year will be a different matter. He has, however, been devouring his own weight in hot cross buns, so I had to make some for him (and the rest of the family).

I made some fabulous ones either last year or the year before (I can't remember) but I couldn't find the recipe again. This current batch turned out very well and were very easy, so I'm recording it for next year! I think using the bread mix worked really well - I think I'll be using this approach again to make things like cinnamon buns or finger buns.

Hot Cross Buns (makes 16)

1 600g packet of Laucke Crusty White Bread Mix for Breadmakers (includes yeast sachet)
300mL milk
1 tablespoon treacle
⅓ cup brown sugar
1 tablespoon mixed spice
1 egg
200g dried mixed fruit
100ml melted butter

For the crosses:
3 tbsp plain flour
2 tbsp water
½ tsp sugar

For the glaze:
2 tsp sugar
½ tsp powdered gelatine
2 tbsp water

Heat the milk to warm (around 38°C) and mix in the yeast sachet and the treacle. Set aside for 10 minutes until the mix is frothy.

Mix the flour, fruit, spice and sugar in a large bowl. Add the milk mixture, the egg and melted butter and mix to form a slightly sticky dough. Sprinkle with flour as necessary and knead until the dough is smooth. Place in a lightly greased bowl and cover with plastic wrap. Leave to rise either overnight in the fridge, or at room temperature for 2-3 hours until it has at least doubled in size.

Punch down the dough and knead it again, then divide into 16 balls and place into a baking tin lined with baking paper. Allow the buns to rise again for 30 minutes, then brush with some milk. Mix the flour, water and sugar for the crosses - it should be a thick paste. Use a piping bag to pipe on the crosses, then bake at 180°C for 25-30 minutes until the buns are golden and sound hollow when tapped.

To make the glaze, mix the water, sugar and gelatine, then heat in the microwave on HIGH for 1 minute. Brush the hot mix over the buns as soon as they come out of the oven.

Best eaten while still warm and spread with butter.

Wednesday, 29 February 2012

Muesli Bars

Another addition to my attempts at making some kid-friendly (and mum-friendly) snacks. Muesli bars can have a lot of fat and refined sugar in them (even home made versions), so making your own gives you more control over the ingredients, and also the portion size. I'm aiming for a much softer and smoother texture than you would normally expect, suitable for a little tot who can't chew whole oats. This is the first time I've used chia seeds in a recipe!

I'm using a brownie  tray (17cm x 27cm) to make these.

Muesli Bars (makes approx 16 small bars)

½ cup wholemeal plain flour
½ cup ground oats (I put oats in the coffee grinder to make a fine meal)
¼ cup white chia seed
¼ cup ground almond meal
¼ cup dessicated coconut
½ cup each of dried apricots, dates and apples
1 egg, beaten
¼ cup virgin coconut oil
¼ cup apple juice concentrate

Preheat oven to 170˚C, and line a baking tray with baking paper.

Place the dried fruit in the food processor and process until finely chopped. Add the fruit mix to the dry ingredients and mix. Add the egg, coconut oil and apple juice concentrate and mix. Press the mixture into the baking tray and smooth the top.

Bake for 15-20 minutes or until golden on top. Cut into small squares or bars. Store in an airtight container.

Friday, 13 January 2012

January Challenge: Day 10

Today we had an afternoon playdate, so I rather than buying something from the bakery, I made some quick blueberry and coconut muffins, using some frozen blueberries. I even used up the last of the macadamia oil - hooray! Now I have some tasty snacks for the weekend.

I started with  this recipe at Taste.com.au, but made some adjustments for what I had on hand. Muffins are very forgiving to recipe changes! This was the final recipe, and it easily made 12 muffins. I have no idea why the recipe says it makes 10.

For dinner I used another pantry favourite - japanese curry roux - to make some  katsu curry, using some turkey schnitzel I bought on special - yum!

Blueberry and Coconut Muffins

Dry:
2 cups plain flour
4 tsp baking powder
1/2 cup coconut flakes
1/2 cup raw caster sugar
1 cup frozen blueberries

Wet:
2 eggs
1/2 cup plain greek-style yoghurt
1/4 cup milk
100ml vegetable oil

Preheat the oven to 180degC. Line a 12-hole muffin pan with muffin cups. 

In a large bowl, mix the dry ingredients and the blueberries. In a smaller bowl mix the wet ingredients, then add to the dry ingredients and mix with a wooden spoon until just combined. Spoon into the muffin pans and bake for 20 minutes, or until golden and firm to the touch. Allow to cool for 5-10 minutes before removing from the tin.

Friday, 6 January 2012

January Challenge: Day 2

In between watching some excellent Test Cricket and gardening, I made a tasty fruit slice using some ripe banana that I was storing in the freezer, some dried fruit and nuts. This slice is based on a great recipe at Taste.com.au, but I've modified it a little for the ingredients I had available - namely a pack of organic prunes that was sitting at the back of the fridge. Peeled ripe banana freezes well, but is only good for mashing once defrosted.

Banana Slice

  • 150g (1 cup) chopped prunes
  • 3/4 cup (packed) brown sugar
  • 250ml (1 cup) water
  • 320g (2 cups) plain flour
  • 1 tbsp baking powder
  • 260g (1 cup) mashed ripe banana
  • 55g (1/2 cup) chopped walnut halves
  • 1/2 tsp bicarbonate of soda
  • 1/2 tsp cinnamon
  1. Preheat oven to 180°C. Line a brownie pan with baking paper, and lightly spray with cooking oil.
  2. Combine prunes, sugar and water in a saucepan over low heat. Cook, stirring, for 2 minutes or until sugar dissolves. Increase heat to medium and bring to the boil. Remove from heat.
  3. Place flour, baking powder, walnuts, cinnamon, and bicarbonate of soda into a large bowl. Add the sugar mixture and mashed banana. Stir until just combined. Spoon into prepared pan and smooth surface with the back of the spoon. Bake in pre-heated oven for 30 minutes or until a skewer inserted into the centre comes out clean. Remove from oven and set aside for 5 minutes to cool before turning onto a wire rack. Serve warm or at room temperature.
  4. This cake is dairy and egg free.

For dinner, I made a lamb and spinach curry using curry paste from the fridge, spinach from the freezer and tinned tomatoes. I also threw out a packet of baby snacks that had gone stale.

Friday, 2 September 2011

Winter Citrus

This year I've really discovered what it means to be eating seasonally. And not surprisingly, it's a little frustrating. At this time of year the winter fruits and vegetables are past their prime, you're sick of eating root vegetables, and the spring greens haven't arrived yet. I can't wait for summer!


Citrus are still good this late in winter, and the home grown stuff is everywhere. Last weekend I saw a family with a lemonade stall out the front of their house, selling fresh home made lemonade to people walking home from the beach. I have oranges, lemons and grapefruit in my fruit bowl, so this week is all about cooking with citrus!


Grapefruit and Poppyseed Cake


My first attempt was some grapefruit and poppy seed muffins. I was making up the recipe as I went, and skimped a bit on the sugar. The result was light and fluffy, but absolutely tasteless, muffins. Oops! Back to a recipe that works (adapted from this one by Joy The Baker). I made two mini-cakes with this mixture. By using the whole fruit, including the pith, you get a very intense flavour, just don't skimp on the sugar!


½ grapefruit + 2 tbsp water
3 eggs
1 cup caster sugar
100ml macadamia oil
1 tsp vanilla
1½ cups plain flour
1 tbsp poppy seeds
2½ tsp baking powder


Cook the grapefruit and water in a covered microwave-safe dish for 5 minutes on HIGH. Allow to cool. Remove the stem and any seeds and blend the grapefruit and cooking liquid until it is a smooth purèe.
In a large bowl beat eggs and gradually add sugar until light and foamy. Keep beating and add oil and vanilla in a thin stream. Add grapefruit puree and mix well. Finally, fold in the flour, baking powder and poppy seeds.


Bake in a greased tin for approx 50 minutes at 170℃, or until a skewer comes out clean. This method works well for other citrus too - try it with oranges, lemons or tangelos (you need about ½ cup of pulp).

Saturday, 20 August 2011

Spelt Pizza

Friday night was very cold, windy and generally awful. What better to brighten things up than some homemade pizza? It really doesn't take long to make (sometimes it's quicker than waiting for a delivery) and you can have any topping you like.

There are some lovely ready-made bases available (the Bazaar ones are particularly nice) but the dough is easy to make. I bought some fancy organic spelt flour to make these ones, but you can use any plain flour you like. I used this recipe on Taste as a starting point, they also have recipes for a gluten free version.

What's your favourite pizza topping? Here's what I made:

Cheese and Spinach (sundried tomato, cottage cheese, silverbeet, egg, shaved zucchini, pickled chilli and parmesan)
Pepperoni (pepperoni, mushrooms and mozzarella)
Spanish (chorizo, mushrooms, red capsicum, sundried tomato, onion and mozzarella)

Saturday, 6 August 2011

Chocolate Hazelnut Cake

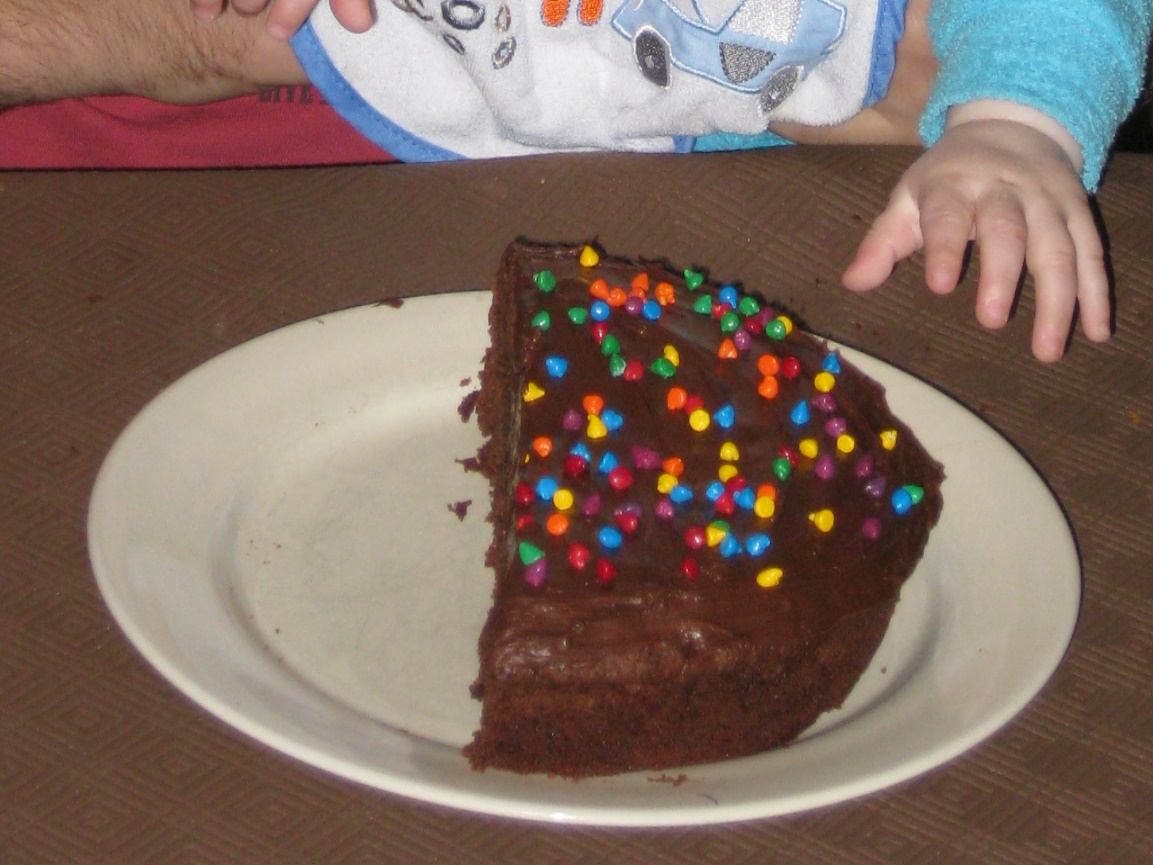
Don't worry, he didn't actually eat any!
Chocolate Hazelnut spread is delicious, but I can't ever see myself putting it onto a slice of bread and feeding it to children, despite the tv ads telling me that it's good for them (ha!).

I think a much better use for it is as a topping for cake.

Happy Half Birthday!

Chocolate Hazelnut Cake

3 eggs
1 cup sugar
1 tsp vanilla
100ml macadamia oil (or other light vegetable oil)
1 cup plain flour (or any wholemeal plain flour)
1/2 cup hazelnut meal
1/4 cup sifted cocoa
1 tsp cinnamon
1 tbsp baking powder
1 grated apple

Grease and line a cake tin, and preheat the oven to 180℃.

Beat the eggs and sugar together until pale and foamy, when the sugar has dissolved. Add the oil, apple and vanilla and mix well. In a separate bowl, mix the dry ingredients, then gradually fold into the wet mixture. Pour the mixture into the tin and bake for approximately 40 minutes, or until an inserted skewer comes out clean. Allow to cool in the tin for at least 15 minutes before you turn it out.

When the cake has cooled completely, spread the top with Chocolate Hazelnut spread.

PS - Sweet William make a vegan chocolate spread. I'm currently eating the organic version from Aldi.

Wednesday, 20 July 2011

Apple, Fig and Pecan Tea Bread


So it's been quiet here on the blog because I've had a bunch of cooking failures lately - mini muffins that turned out rubbery and burnt on the bottom; raisin, chocolate and oat biscuits that didn't taste that great (and were a bit burnt on the bottom) - FAIL!


See a pattern here? I really don't like my oven. It's about as cheap an oven as you can get. It has an element on the bottom that seems to heat up to about 1000 degrees until the top of the oven reaches the desired temperature. This means that anything in the bottom half of the oven gets burnt to charcoal. Oh what I would give for a fan-forced oven!


But enough whinging for today - there's cooking to do. In my box this week I ordered a kilo of juicing apples. These are apples that are considered "seconds" (but still so tasty!) so I'm cooking them up. Some will become home made puree for baby, some will become dessert, and the rest are going into a sweet loaf to have with tea.


This recipe was inspired by one on the side of a pack of flour - but I've changed it a little bit. It's quite a thick mixture.


300g plain flour
2 tsp baking powder
125g raw sugar
2 tsp cinnamon
1 tsp ginger
100g pecan nut pieces (roughly chopped)
1 grated apple (skin on)
150g dried figs
1 tsp earl grey tea (or 1 tea bag)
2 eggs
60ml light oil
60ml honey
1 tsp vanilla extract


Tea-soaked figs
Remove the stems from the dried figs and chop into pieces. Add 500ml of boiling water to the tea and add the figs. Soak for at least 2 hours, or overnight. Drain (you can leave some of the tea leaves behind).


Grease and line a loaf tin and preheat the oven to 180℃.


Mix the dry ingredients in a bowl. In a separate bowl, lightly beat the eggs, and add apple, oil, honey and vanilla. Mix the wet mixture and dry mixture together until just combined. Pour into the tin and bake for 45 minutes or until cooked.

Tuesday, 28 June 2011

Italian Honey Cookies (Mostaccioli?)


One of the benefits of growing up in an area with lots of Maltese and Italian families was that every year the fiesta would be held at the local church, and all sorts of traditional goodies would be made and sold at the stalls. There would be slabs of peanut and almond brittle, pastizzi (my favourites flavours remain fetta cheese and curried pea), gingerbread and hard honey biscuits shaped like hearts, baskets, horses, mermaids...and more. Now I have to trek to the Norton St Festa at Leichhardt if I want to find these things, but they always remind me of being a kid. I've never seen these sold other than at a stall at a festa, but last week a friend of mine found them in a deli. They were called Mostaccioli, or "little moustaches", and certainly this is how they were shaped. Finding a recipe for these is hard! It seems they go by a number of names, depending on the region. From what I've been able to gather from the Internet, they're Calabrian in origin, and probably Arabic before that.

The ones I know are a hard biscuit flavoured with honey, but there seem to be variations that use vincotto, aniseed flavoured liqueur, or nuts. Some recipes include milk and eggs. I wish I had a nonna!

The most basic recipe I've found uses honey, water and flour. This seems to be the most traditional recipe and it fits with my idea of the biscuit. It's dense, and HARD - you really need to gnaw at them, and they make a wonderfully satisfying crack when you break them. So here's my attempt. This is a small batch because honey isn't so cheap I wanted to waste cups of it in a potential disaster. This page had lots of interesting information, but the english translation isn't very good (and at times amusing).
Mixing the flour
into the honey and water
Italian Honey Biscuits

¼ cup water
¾ cup honey
plain flour as needed (2-3 cups)

-Warm the water and honey in a saucepan until melted and mixed, then pour this syrup into a mixing bowl. Sift flour into the mix bit by bit until it comes together to make a thick, soft dough. Wrap and leave in the fridge overnight.
-Knead the dough until smooth and then shape it into biscuits.
-Bake until golden, then allow to cool.

The dough is ready to rest
The dough came together surprisingly well, although I was just guessing at the texture and how much flour to add. Like a lot of Italian recipes, it was simple, but time consuming. You don't want to rush by dumping in too much flour, or trying to speed things up with a beater. The amount of flour to add will vary depending on the type of flour. Making the shapes also is a skill I don't have - I made some very basic shapes, and also used a cutter. 
Poor little guys didn't
stand a chance
The baking temperature was tricky to work out, although I have an awful oven. The first batch burned, so  turned the oven way down to 150 degrees C for the second batch. I also gave up on trying to make fancy shapes and stuck to rounds. What I did learn from the burnt batch is that they tasted pretty good, and that this dough is better thick than thin - the rolled shapes were rock hard and pretty inedible. The second batch also tried to burn, but I caught them in time. I also experimented with some glazes - olive oil or milk, but that didn't make any difference.
Only a bit brown underneath

So the verdict is that they taste pretty close to the real thing, which is better than I hoped for on the first attempt.

Friday, 17 June 2011

Guavas!

I got a lovely bag of fresh guavas from my friend at A Sydney Foodie. I've never eaten fresh ones before, only the nectar in a bottle. The first thing that stuck me is the perfume - they smell so absolutely divine! The flavour is all tropical - hints of banana, passionfruit...but they won't keep long so the best thing is to cook them into something delicious.


First up is an asian-inspired dessert, then a simple cake with macadamias and guavas.


Pandan and Coconut Tapioca Pudding with Guava Jelly


Tapioca is one of those love-hate things. I love the bubbly chewy texture of the little pearls in desserts and drinks. You can cook tapioca the same way you would cook a rice pudding with milk, sugar and vanilla, or you can go with more asian flavours like coconut and pandan. I find cooking the pearls separately gives you a better result, with more control over the starchiness. This dessert is also dairy free and gluten free!


1/2 cup sago(seed tapioca), cooked and rinsed
100ml coconut cream
1/4 cup sugar
1 teaspoon tapioca flour
2-3 drops of pandan essence (optional)


Mix the tapioca flour with the coconut, sugar and tapioca pearls in a small saucepan. Cook for 3-5 minutes over a medium heat until the mix thickens. Add the pandan essence and remove from heat, Pour into heat-proof serving glasses and allow to cool.


Pulp from 5 guavas (or use guava nectar)
150ml water
1 tbsp sugar
½ tablespoon of gelatine powder


Blend the guava pulp with 50ml of water, and then strain to remove the seeds. Mix the gelatine and sugar with 100ml boiling water and mix into the guava pulp. Allow to cool slightly then pour over the tapioca layer and chill for at least 2 hours. I made 2 servings.


Guava and Macadamia Cake


Not a great picture
Based on this recipe by Steve Manfredi, but with a couple of modifications - green ginger wine is great for cooking (and drinking - it's yummy!) This is a pretty basic cake recipe. You could swap the macadamias for other nuts, and swap the fruit for anything you have that needs cooking up.


6 guavas, peeled
80g macadamia nuts, processed to a rough meal
150g flour
100g sugar
125g softened butter
1 egg
1 tsp vanilla extract
4 tbsp Stone's green ginger wine
Jam for glazing


Chop 2 of the guavas and place them in a blender or food processor. Scoop the seedy flesh out of the other 4 guavas and add to the food processor. Slice the 4 guavas and set them aside.
Add the ginger wine to the guava pulp and blend, then pass through a sieve to remove the seeds.
Beat together the butter, sugar and vanilla essence. Add the egg and beat until combined. Add the guava puree, then beat again. Mix the baking powder with the flour and add this gradually to the cake mix, beating in between. Finally, stir in the ground macadamia.
Pour the mix into a round cake pan and place the guava slices on top. Bake at 180 degrees C for 30 minutes. To glaze the cake, warm a tablespoon of jam in the microwave, then brush over the top of the cake. 

Sunday, 12 June 2011

Mini Carrot Cake Loaves with Caramelised Pineapple

I remember reading about a certain Banana bread company that faced collapse when Cyclone Larry wiped out the banana crop a few years back. What do you do when your core business relies entirely on a foodstuff that has just tripled in price? They invented Pear and Raspberry Bread! It's a reminder not to get too set in your ways when cooking - it's easy to keep making the same thing over and over.

I've dragged out the old brown Margaret Fulton cookbook. It has some fantastic cake recipes, but there are three that are family favourites: Carrot and Pineapple Health Cake (so-called because it has oil instead of butter!), Banana Cake and Spiced Pumpkin Cake. Flicking through the book, there are plenty of other lovely recipes, so I'm going to try some new ones over the next few months. Carrot cake, though, is great to make in winter when carrots are so sweet and tasty. I also have a beautiful hybrid sweet pineapple. I decided use this rather than using the tinned pineapple in the recipe. 

Pretty Pineapple!
I thought I'd share my method for trimming a pineapple. I remember watching a japanese chef do this at a restaurant one night - it was a revelation! The problem with trimming a pineapple is how to get the "eyes" out without cutting so deeply into the pineapple that you lose all the flesh. The best bits, after all, are just underneath the skin. Cut the top  and bottom off the pineapple and cut off the skin, but don't cut too deeply - just enough to expose the flesh. Now look at the eyes - they spiral around the pineapple. Get a small sharp knife and make little v-shaped cuts to remove the eyes, moving around and down the pineapple. You're only just cutting enough flesh to remove the eyes, and making a pretty pattern at the same time! Then you can slice the pineapple as you need it. Another technique is to use a small melon baller to remove the eyes - a safer method if you're not great with your knife skills (perhaps a job for the kids!)

Caramelised Pineapple:
so much better than tinned in syrup!
For this recipe I removed the core of the pineapple, finely diced it, then caramelised it with some coconut palm sugar. This is a sustainable alternative to regular palm sugar, and it tastes like a cross between palm sugar and brown sugar. I also caramelised some thin slices for the top of the cake. The cake also contains pecans and sultanas. To finish, I made a light cream cheese frosting which was a bit rushed and dodgy but did the job.

PS - I've finally realised why hybrid pineapples (such as Bethonga) are sold without their leaves. It's so the growers can protect the variety. This makes perfect sense when you think about it, but I'd never thought about it.

Monday, 30 May 2011

Mini Chestnut and Pumpkin Tarts

I usually buy chestnuts once a year and try to make something nice with them. I've made chestnut cakes, chestnut stuffings, and I think even a chestnut risotto one year. Given they're not cheap and have such a short season, one dish is usually all I get to make.


This year I've made my own chestnut puree by boiling the chestnuts, peeling them, simmering with water, milk and honey, then blitzing with the stick blender. I've combined this with the other great autumn ingredient, pumpkin, to make some mini pumpkin and chestnut tarts. The mixture contains some egg, cream, nutmeg and cinnamon.


I find that frozen pastry circles in a muffin tin don't need to be blind baked to come out nice and firm on the bottom - you just have to make sure you line the bases with baking paper so that they come out and don't get stuck. This recipe was also good because I was able to make the mixture the night before and then just had to quickly assemble and bake them before my afternoon tea guests arrived.

A chestnut cake at Lucky's Cafe, Hakone (Japan), 2008